
When your HVAC system struggles to circulate air effectively, it may be time to consider replacing the blower motor. A well-functioning blower motor is crucial for maintaining comfort in your home, ensuring consistent airflow and efficient heating or cooling. If you've noticed unusual noises or inadequate airflow, addressing the blower motor issue promptly can save you time and money in the long run.
At Moody Heating and Air Conditioning, we understand the importance of reliable HVAC systems. Our fully certified technicians bring years of experience in diagnosing and replacing blower motors, using the latest tools to guarantee efficient repairs. You can trust us to meet your needs with a 100% satisfaction guarantee, ensuring that your HVAC system operates at peak performance.
Replacing a blower motor may seem daunting, but with the right knowledge and guidance, you can manage this task effectively. This article will walk you through the steps involved, helping you understand not only how to replace the motor but also when to call in the experts. Taking action now can restore your home's comfort and enhance the efficiency of your HVAC system.
Understanding the HVAC Blower Motor
The HVAC blower motor plays a critical role in distributing heated or cooled air throughout your home. Understanding its functions, common signs of failure, and the various types of motors can help you maintain an efficient heating and cooling system.
Functions of a Blower Motor
The primary function of a blower motor is to move air through the HVAC system. It draws air from inside your home, pushes it through the heating or cooling components, and then circulates it back into different rooms. This process ensures consistent temperature regulation and air quality.
Blower motors also assist with ventilation. They help eliminate indoor air pollutants and maintain comfort levels by moving stale air out and fresh air in. Additionally, they are responsible for managing airflow for both heating and cooling modes, ensuring your system operates effectively in any season.
Common Signs of a Failing Blower Motor
Recognizing the signs of a failing blower motor is essential for timely repairs. One common symptom is unusual noises, such as grinding or squeaking, which may indicate worn-out bearings or trouble with the fan. You might also notice weak airflow, suggesting reduced performance or a motor that isn't functioning at full capacity.
Frequent cycling or the blower not turning on at all are other red flags. If the motor is running hot or trips breakers often, those are indicators of electrical issues. It's crucial to address these problems quickly to avoid further damage and maintain system efficiency.
Types of HVAC Blower Motors
There are several types of blower motors used in HVAC systems. The two main categories are single-speed and variable-speed motors.
Single-speed motors operate at one speed and are typically found in older systems. They're less efficient because they run at full power, regardless of the heating or cooling demand.
Variable-speed motors, on the other hand, can adjust their speed based on demand. This capability increases efficiency and enhances comfort by providing steady airflow. Moody Heating and Air Conditioning specializes in these systems, ensuring that you have access to advanced technology that meets your needs effectively.
When it comes to installation and maintenance, hiring fully certified technicians, like those at Moody Heating and Air Conditioning, guarantees that you receive the best service. Your system's performance relies on professional expertise and access to the latest tools.
Preparation for Replacing the Blower Motor
Before starting the blower motor replacement, it's crucial to gather the necessary tools, ensure your personal safety, and follow specific procedures. Proper preparation will help streamline the process and minimize risks.
Essential Tools and Materials
To replace the HVAC blower motor, you need to gather the following tools and materials:
- Screwdrivers: A set of Phillips and flat-head screwdrivers for various screws.
- Nut Drivers and Wrenches: Essential for loosening and removing bolts.
- Blower Wheel Puller: Helpful for removing the blower wheel without damage.
- Penetrating Oil: Assists in loosening stubborn fasteners.
- Rags and Sand Cloth: To clean surfaces and ensure proper fittings.
- Safety Goggles and Gloves: For personal protection during the process.
Having these tools ready will make the replacement process more efficient. Ensure each tool is in good condition before beginning your work. A well-prepared technician will reduce the chance of unexpected delays.
Personal Protection and PPE
Prioritize your safety by using appropriate personal protective equipment (PPE). Equip yourself with:
- Safety Goggles: Protect your eyes from debris and accidents.
- Gloves: Use durable, non-slip gloves to maintain a good grip and protect your hands.
- Dust Mask: This helps avoid inhaling any dust or debris from the HVAC system.
- Long Sleeves and Pants: Wear protective clothing to shield your skin.
By utilizing PPE, you minimize the risk of injury while working, ensuring a safer environment during the motor replacement.
Safety Procedures Before Removal
Before starting the removal process, follow these essential safety procedures:
- Turn Off Power: Always switch off the power supply to your HVAC system to prevent electrical shock.
- Verify Power is Disconnected: Use a multimeter to confirm no electricity is flowing to the unit.
- Document Connections: Take photos or notes of wiring connections to make reassembly easier.
- Check for Debris: Inspect the area around the blower motor for any obstructions or hazards.
Following these steps will enhance your safety. As a trusted expert, Moody Heating and Air Conditioning emphasizes proper preparation and safety, ensuring efficient and secure HVAC repairs.
Accessing the Blower Motor Location
Accessing the blower motor location in your HVAC system requires several steps and careful attention to layout. Knowing where specific components are located helps facilitate a smoother replacement process.
Removing Interior Panels and Covers
Begin by carefully removing the necessary interior panels to access the blower motor. Start with the a-pillar trim, which may require gentle prying to detach without causing damage.
Next, you'll need to remove the footwell cover to gain visibility and access to the footwell area. Ensure you locate all the screws or clips securing these components, as skipping these can lead to unnecessary damage.
Once these panels are out, look for any additional covers that may obstruct your view of the HVAC assembly. Keep a small container handy for screws and clips to prevent loss.
Identifying HVAC Assembly Components
With the panels removed, locate key components of the HVAC assembly. The ducts and other vital parts should be easily visible now. Look for the blower motor housing, often connected to the cross car beam for stability.
Familiarize yourself with the layout. Identify the ip carrier as this can sometimes require adjustment to safely maneuver around it. Recognizing each part will save time during reinstallation. Safety is crucial, so ensure that you disconnect power before proceeding further.
Working Around the Center Console and Glove Box
Accessing the blower motor may also involve maneuvering around the center console and glove box. Begin by removing the glove box; it often has simple clips that allow for quick detachment.
Inspect the area near the steering wheel and any components connected to the touchscreen for obstructions. You may need to shift the center console slightly for improved access.
Be cautious of wiring and connectors as you work. Taking the time to handle each piece carefully ensures a smoother replacement experience. The task is complex, but with proper technique and possibly the assistance of a professional like Moody Heating and Air Conditioning, you can ensure it is done right.
Moody Heating and Air Conditioning is your trusted HVAC partner, as we employ fully certified technicians with extensive experience.
Blower Motor Removal and Replacement Process
Replacing the blower motor in your HVAC system involves careful steps to ensure safe and effective installation. Each task, from disconnecting electrical connectors to securely handling components, is essential for a smooth process.
Disconnecting Electrical Connectors
Start by ensuring that the power to your HVAC system is completely turned off. Locate the electrical connector on the blower motor, which is usually secured by clips or screws. Carefully detach these connectors, ensuring not to damage any wires. Label each wire or take a picture for reference during reinstallation.
Once disconnected, use a voltage tester to double-check that no electrical current is flowing. This step is critical to avoid any electrical hazards while you work. If needed, consult the manual or diagrams to confirm proper wiring locations.
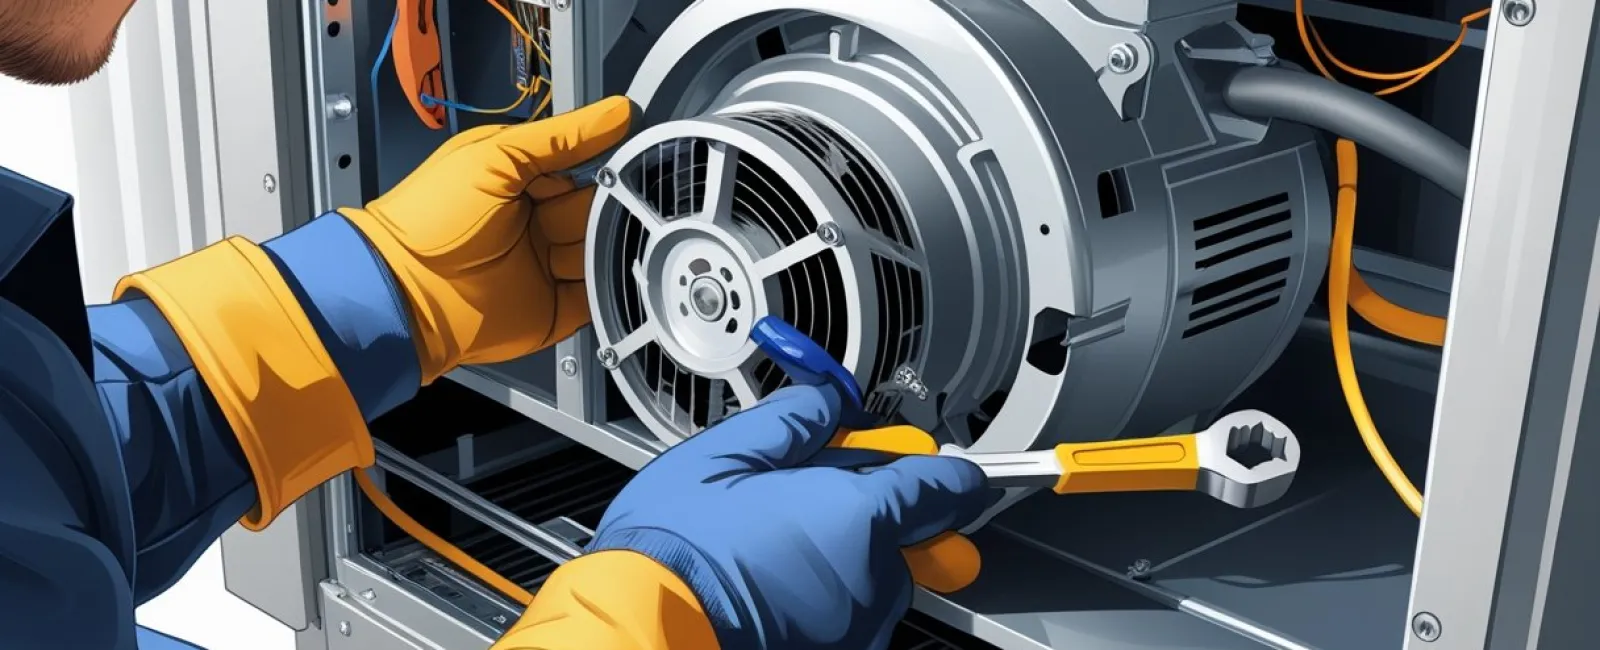
Detaching the Motor Shaft and Blower Wheel
With the electrical connectors safely removed, you can focus on detaching the motor shaft from the blower wheel. Look for any retaining screws or clips that might be holding the blower wheel in place. Carefully remove these with a screwdriver or appropriate tool.
Once free, gently pull the blower wheel off the motor shaft. If it feels stuck, apply a small amount of lubricant to help ease it off without causing damage. Make sure to keep the shaft clean to ensure a smooth fit for the new motor.
Handling the Capacitor Safely
If your blower motor is connected to a capacitor, it's essential to handle this component with care. Start by disconnecting any wiring connected to the capacitor. Use insulated gloves to avoid accidental shocks since capacitors can retain charge even when power is off.
Next, remove the capacitor from its mounting bracket, typically secured with screws. It's wise to discharge the capacitor before removing it completely. This can be done by connecting resistors across its terminals briefly, ensuring a safer work environment.
Securing Components with Bungee Cord
As you progress, maintaining organization of your components is crucial. Use bungee cords to secure any loose parts, such as wires or the blower wheel, keeping them out of your working area. This helps prevent any unintentional damage or obstruction, allowing you to focus entirely on the replacement.
Make sure the bungee cord is firmly attached but not so tight that it causes strain on the components. This minimizes the risk of future complications. When you are ready to install the new blower motor, simply remove the bungee cord and proceed with the next steps confidently.
Following these steps will guide you through the blower motor removal and replacement process effectively. For expert assistance, turn to Moody Heating and Air Conditioning, where our certified technicians use the latest tools and techniques to ensure high-quality results.
Installation and Final Checks
Proper installation and thorough final checks are crucial to ensure your new HVAC blower motor operates efficiently and reliably. This section will guide you through the installation process, checking the system's operation, and final reassembly.
Installing the New Blower Motor
Begin by carefully positioning the new blower motor into the housing of your furnace. Ensure that it's aligned correctly with the mounting brackets. Utilize the bolts provided to secure the motor tightly without over-torquing, as this may damage the components.
Next, connect the wiring, adhering to the color-coded schematic of your previous setup. Ensure that all connections are tight to prevent electrical issues. After establishing the connections, attach the fan blade to the motor shaft, and ensure it is properly seated. Use the set screw to tighten it securely.
Testing HVAC Operation
Once installation is complete, it's crucial to test the HVAC system. Restore power and set your thermostat to activate the furnace. Listen for any unusual noises, which may indicate a problem with the motor or installation.
Check the airflow through the vents; it should be strong and steady. If there are any irregularities, turn off the system immediately to prevent damage. Monitor the temperature for a few minutes to ensure it reaches the desired setting. This step is vital to confirming that the blower motor is functioning correctly and efficiently.
Reassembly and Inspection
With the blower motor successfully installed and tested, proceed with the reassembly of the furnace. Replace any access panels or covers, securing them properly to ensure safety and performance.
After reassembly, conduct a thorough inspection of the area. Double-check that all tools and materials are removed to prevent obstruction or accidents. It's advisable to keep documentation of your work for future reference.
For any uncertainties or additional support, consult Moody Heating and Air Conditioning, your trusted HVAC experts. Our certified technicians, equipped with the latest tools, ensure efficient repairs and installations, backed by our 100% satisfaction guarantee.
Frequently Asked Questions
When it comes to replacing an HVAC blower motor, you may have several questions. This section addresses common inquiries regarding cost, DIY considerations, lifespan, and more to help you make informed decisions.
How much does it typically cost to replace an HVAC blower motor?
The cost to replace an HVAC blower motor can range widely based on several factors. Typically, you might expect to pay between $400 and $800, which includes both parts and labor. Your local market and specific unit type can influence the price.
Can I replace an HVAC blower motor by myself, and if so, what should I consider?
You can replace an HVAC blower motor yourself if you have the right tools and experience. It is important to understand your system's specific configuration. Ensure you follow safety precautions and have guidance from resources, such as Moody Heating and Air Conditioning, to assist in the replacement process.
What is the average lifespan of an HVAC blower motor before replacement is needed?
The average lifespan of an HVAC blower motor is typically between 10 to 15 years. Factors such as usage, maintenance, and environmental conditions can impact this lifespan. Regular maintenance can help extend the motor's life.
Is it more cost-effective to replace a blower motor or purchase a new furnace?
Whether to replace a blower motor or buy a new furnace depends on the age of your system and other factors. If your furnace is over 15 years old and requires multiple repairs, it may be more cost-effective to invest in a new unit. A consultation can help you assess the best option.
What factors affect the cost of replacing an HVAC blower motor?
Several factors can influence the cost of replacing an HVAC blower motor. These include the specific motor type, labor costs in your area, and any additional repairs that might be necessary. A thorough inspection by experts like Moody Heating and Air Conditioning can provide a clear estimate.
How long does a typical HVAC blower motor replacement take to complete?
Typically, replacing an HVAC blower motor can take about 2 to 4 hours. This timeframe depends on the complexity of the system and any unforeseen issues that may arise during the process. Experienced technicians can often complete the job efficiently and effectively.